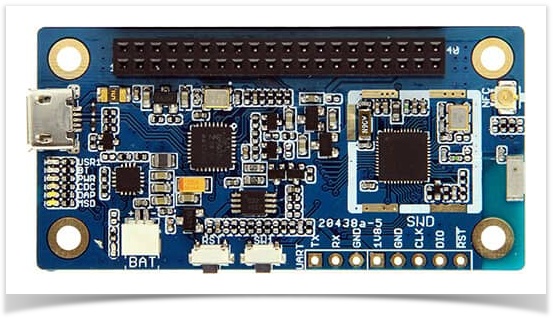
Nitrogen is a 96Boards compliant IoT Edition board and is a low cost option for debugging Arm Cortex M support in OpenOCD. This guide provides a quick setup guide for Nitrogen board with the outcome of debugging OpenOCD code related to Arm Cortex M support.
Prerequisite: Set up OpenOCD development environment
Host Environment: Ubuntu version 18.04
Hardware requirements:
|
|
|---|
Build Zephyr Blinky demo for Nitrogen board:
Zephyr getting started guide[1] provides a step by step guide to set up Zephyr build environment and build a LED blinking demo for Nitrogen board. Following steps are taken from Zephyr getting started guide and more details can be found here[1].
Install dependencies:
| Code Block | ||||
|---|---|---|---|---|
| ||||
sudo apt install --no-install-recommends git cmake ninja-build gperf |
...
ccache dfu-util device-tree-compiler wget |
...
python3-dev python3-pip python3-setuptools python3-tk python3-wheel xz-utils file |
...
make gcc gcc-multilib g++-multilib libsdl2-dev |
Note: Update cmake version if cmake --version returns < 3.13.1
Setup prerequisites and build Zephyr demo app
...
Get Zephyr and install Python dependencies:
| Code Block | ||||
|---|---|---|---|---|
| ||||
sudo apt-get update
sudo apt-get upgrade
sudo apt-get install git
sudo apt install build-essential ncurses-dev doxygen dfu-util device-tree-compiler |
Download zephyr from git mirror:
| Code Block |
|---|
git clone https://gerrit.zephyrproject.org/r/zephyr
|
Download zephyr-sdk from the link below:
# Install west, and make sure ~/.local/bin is on your PATH environment variable:
pip3 install --user -U west
echo 'export PATH=~/.local/bin:"$PATH"' >> ~/.bashrc
source ~/.bashrc

# Get the Zephyr source code:
west init ~/zephyrproject
cd ~/zephyrproject
west update

# Export a Zephyr CMake package. This allows CMake to automatically load boilerplate code    # required for building Zephyr applications.
west zephyr-export

# Zephyr's scripts/requirements.txt file declares additional Python dependencies. Install them    # with pip3.
pip3 install --user -r ~/zephyrproject/zephyr/scripts/requirements.txt |
Install a Toolchain:
| Code Block | ||||
|---|---|---|---|---|
| ||||
# Download the latest SDK installer: wget https://github.com/zephyrproject-rtos/ |
...
sdk- |
...
ng/releases/download/ |
...
v0. |
...
11. |
...
3/zephyr-sdk-0. |
...
11. |
...
3-setup.run |
...
| Code Block |
|---|
# Run the installer, installing the SDK in /opt/zephyr-sdk-0.11.3: chmod +x zephyr-sdk-<version>0.11.3-setup.run Sudo ./zephyr-sdk-<version>0.11.3-setup.run |
To use the Zephyr SDK, export the following environment variables:
| Code Block |
|---|
export ZEPHYR_GCC_VARIANT=zephyr export ZEPHYR_SDK_INSTALL_DIR=<zephyr-sdk-path>/zephyr-sdk/ |
To use the same toolchain in new sessions in the future create file ~/.zephyrrc
| Code Block |
|---|
cat <<EOF > ~/.zephyrrc
export ZEPHYR_GCC_VARIANT=zephyr
export ZEPHYR_SDK_INSTALL_DIR=<zephyr-sdk-path>/zephyr-sdk/
EOF |
Build Zephyr Hello World sample application
| Code Block |
|---|
cd <zephyr_root_path>
. zephyr-env.sh
cd samples/hello_world/
make BOARD=96b_nitrogen |
Flashing, Running and Debugging using pyOCD
Install Prerequisites:
| Code Block |
|---|
sudo apt-get install python-pip python-dev python-yaml minicom gdb-arm-none-eabi
sudo -H pip install --upgrade pip
sudo -H pip install --pre -U pyocd
|
Verify board is detected by pyOCD
| Code Block |
|---|
sudo pyocd-flashtool -l
|
Erase the flash memory in the nRF52832
| Code Block |
|---|
sudo pyocd-flashtool -d debug -t nrf52 -ce
|
Flash the Hello World application
| Code Block |
|---|
cd <zephyr_root_path>
sudo pyocd-flashtool -d debug -t nrf52 samples/hello_world/outdir/96b_nitrogen/zephyr.hex |
Run minicom to listen for output
| Code Block |
|---|
sudo minicom -D /dev/ttyACM0 -b 115200 |
Press reset button on nitrogen board to verify following output
| Code Block | ||
|---|---|---|
| ||
Hello World! arm
|
Start pyocd-gdbserver in a new terminal window and launch debug session
| Code Block |
|---|
sudo pyocd-gdbserver
arm-none-eabi-gdb outdir/96b_nitrogen/zephyr.elf
target remote localhost:3333
|
Flashing, Running and Debugging using openOCD
Build OpenOCD:
Follow Getting started with OpenOCD Development to build openOCD from sources.
Spawn openOCD connection to Nitrogen Board:
| Code Block |
|---|
-d /opt/zephyr-sdk-0.11.3 |
Build blinky demo and load it up using GDB via OpenOCD:
| Code Block | ||||
|---|---|---|---|---|
| ||||
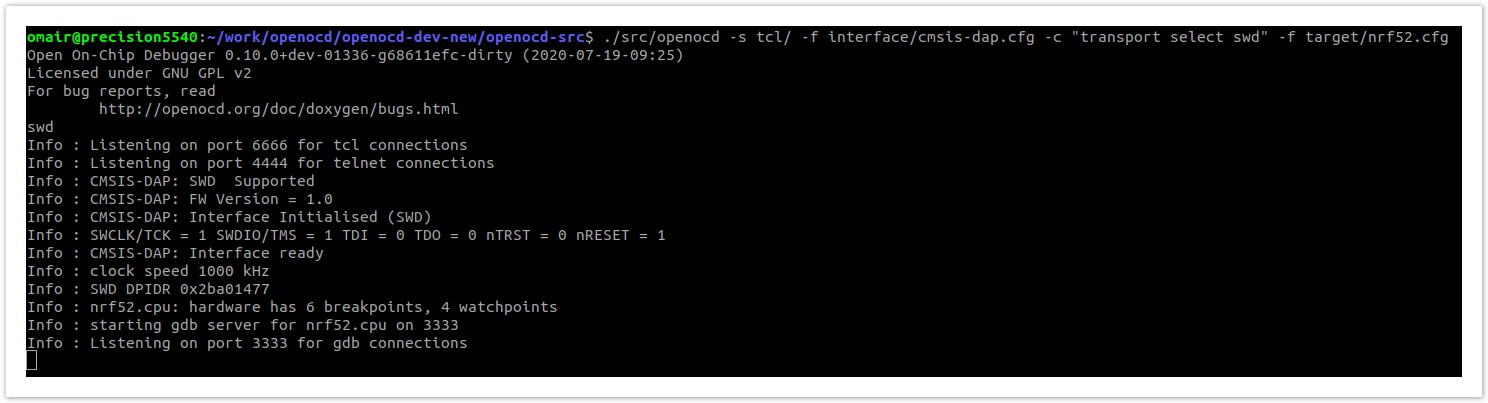
# Run from the root of the zephyr repository eg: ~/zephyrproject/zephyr west build -p auto -b 96b_nitrogen samples/basic/blinky # Connect Nitrogen board to host computer via micro usb cable # Wait for the MBED folder to mount automatically # Run OpenOCD from its source folder ./src/openocd -s tcl/ -f interface/cmsis-dap.cfg -c "transport select swd" -f target/nrf52.cf arm-none-eabi-gdb outdir/96b_nitrogen/zephyr.elf target remote localhost:3333 target remote localhost:3333 |
Adding udev rule:
At this point you might be able to use OpenOCD without any issue. However, chances are that you will face with this error message when you try to use OpenOCD on the terminal.

Assuming that you have your board connected, this is likely to be caused by the current user not having the right access permission to your board USB HID driver. You can verify this by running OpenOCD as root using sudo. However, if we are planning on using OpenOCD with an IDE (for example Eclipse) or some other development environment, then to make our life a little easier we should add a system rule that will automatically mount the our board usb with an open permission so that any user can use it. To do this, we need to first find out our board USB vendor and product id. We can do this by running the USB list command. However, we may need to run this command a few times with and without the board connected to identify which of the USB devices listed belong to our board.
| Code Block |
|---|
lsusb
|
You should get a message like this.

These are two set of hexadecimal characters that you need to make a note of for your device.
Using this command we are going to create a new udev rule for our USB device. This command will simply create a new text file in the udev rule.d folder which will be invoked when ever out board is connected.
| Code Block |
|---|
sudo nano /etc/udev/rules.d/CMSIS.rules |

Type in the following lines into the new file. Make sure that you replace the idVendor and idProduct hexadecimal values between the double quotes with the ones that you noted earlier.
| Code Block |
|---|
KERNEL=="hidraw*", ATTRS{idVendor}=="0d28", ATTRS{idProduct}=="0204", MODE="0666"
SUBSYSTEM=="usb", ATTRS{idVendor}=="0d28", MODE="0666"
SUBSYSTEM=="usb_device", ATTRS{idVendor}=="0d28", MODE="0666" |
...
To save the file, press Ctrl+X. Then Press Y and to accept and exit the editor press Enter. You will need to reboot your computer for the new changes to take effect but apart from that you are ready to start using OpenOCD.
To install the latest development version (master branch), do the following:
| Code Block |
|---|
pip install --pre -U git+https://github.com/mbedmicro/pyOCD.git#egg=pyOCD
|
Common Errors:
| Info | ||
|---|---|---|
| ||
If you don’t use sudo when invoking pyocd-flashtool, you might get any of these errors |
| Info | ||
|---|---|---|
| ||
echo 'ATTR{idProduct}=="0204", ATTR{idVendor}=="0d28", MODE="0666", GROUP="plugdev"' > /etc/udev/rules.d/50-cmsis-dap.rules |
Flashing an Application to 96Boards Nitrogen:
This example uses the Hello World sample with the pyOCD tools. Use the make flash build target to build your Zephyr application, invoke the pyOCD flash tool and program your Zephyr application to flash.
| Code Block |
|---|
cd <zephyr_root_path>
. zephyr-env.sh
cd samples/hello_world/
make BOARD=96b_nitrogen
|
References:
...
cfg

# Start gdb and load blinky demo onto Nitrogen board's flash memory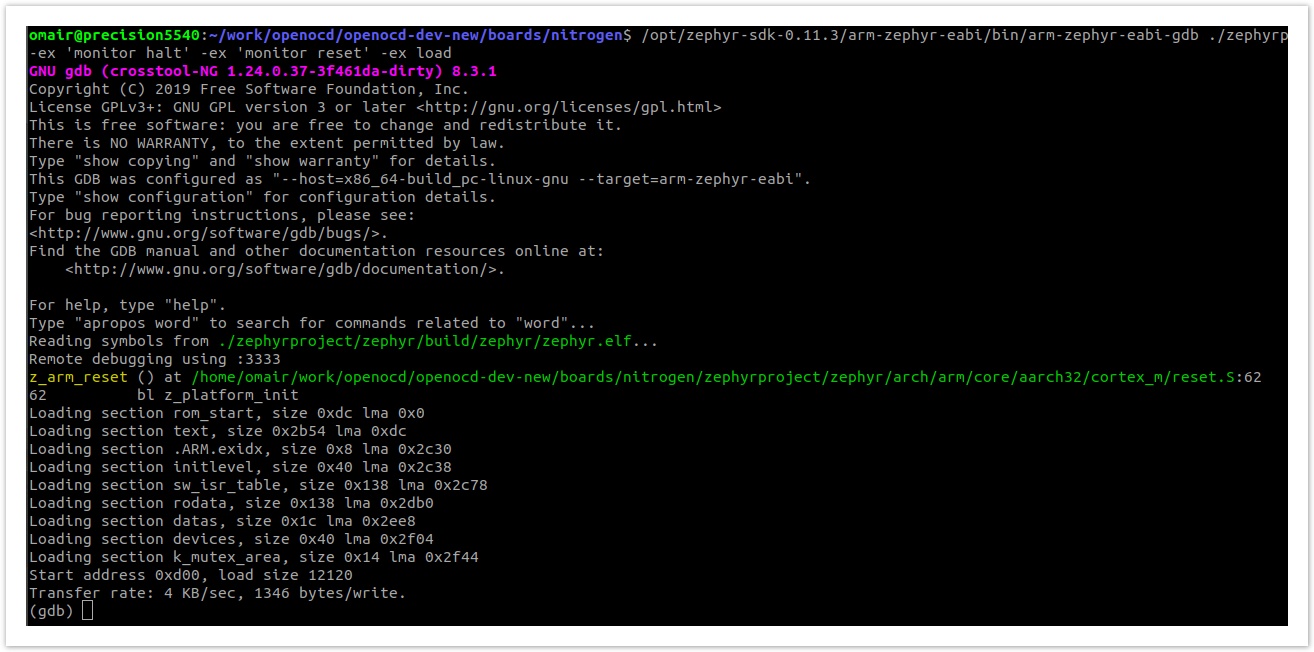
/opt/zephyr-sdk-0.11.3/arm-zephyr-eabi/bin/arm-zephyr-eabi-gdb ~/zephyrproject/zephyr/build/zephyr/zephyr.elf -ex 'target remote :3333' -ex 'monitor halt' -ex 'monitor reset' -ex load |
Expected output of OpenOCD console after successfully connecting with Nitrogen board
Expected output of GDB console after successfully loading blinky demo:
References:
- https://docs.zephyrproject.org/latest/getting_started/index.html
- https://docs.zephyrproject.org/latest/boards/arm/96b_nitrogen/doc/index.html