...
Essentially, pyvenv sets up a new directory that contains a few items which we can view with the ls command:
Set up zeromq
$ wget https://github.com/zeromq/libzmq/releases/download/v4.2.2/zeromq-4.2.2.tar.gz
$ tar xvzf zeromq-4.2.2.tar.gz
$ sudo apt-get update && \
$ sudo apt-get install -y libtool pkg-config build-essential autoconf automake uuid-dev
$ cd zeromq-4.2.2
$ ./configure
$ sudo make install
$ sudo ldconfig
# Check installed
$ ldconfig -p | grep zmq
# Expected
############################################################
# libzmq.so.5 (libc6,x86-64) => /usr/local/lib/libzmq.so.5
# libzmq.so (libc6,x86-64) => /usr/local/lib/libzmq.so
############################################################ |
...
$ jupyter notebook
[I 08:58:24.417 NotebookApp] Serving notebooks from local directory: /Users/catherinelinaro
[I 08:58:24.417 NotebookApp] 0 active kernels
[I 08:58:24.417 NotebookApp] The Jupyter Notebook is running at: http://localhost:8888/
[I 08:58:24.417 NotebookApp] Use Control-C to stop this server and shut down all kernels (twice to skip confirmation). |
...
Output
[I 19:46:22.031 NotebookApp] Writing notebook server cookie secret to /home/sammylinaro/.local/share/jupyter/runtime/notebook_cookie_secret
[I 19:46:22.365 NotebookApp] Serving notebooks from local directory: /home/sammylinaro/environments
[I 19:46:22.365 NotebookApp] 0 active kernels
[I 19:46:22.366 NotebookApp] The Jupyter Notebook is running at:
[I 19:46:22.366 NotebookApp] http://localhost:8888/?token=Example_Jupyter_Token_3cadb8b8b7005d9a46ca4d6675
[I 19:46:22.366 NotebookApp] Use Control-C to stop this server and shut down all kernels (twice to skip confirmation).
[W 19:46:22.366 NotebookApp] No web browser found: could not locate runnable browser.
[C 19:46:22.367 NotebookApp]

    Copy/paste this URL into your browser when you connect for the first time,
    to login with a token:
        http://localhost:8888/?token=Example_Jupyter_Token_3cadb8b8b7005d9a46ca4d6675&tokenExample_Jupyter_Token_3cadb8b8b7005d9a46ca4d6675
|
...
Output [I 20:35:17.004 NotebookApp] Writing notebook server cookie secret to /run/userlinaro/1000/jupyter/notebook_cookie_secret
[I 20:35:17.314 NotebookApp] Serving notebooks from local directory: /home/sammylinaro
[I 20:35:17.314 NotebookApp] 0 active kernels
[I 20:35:17.315 NotebookApp] The Jupyter Notebook is running at:
[I 20:35:17.315 NotebookApp] http://localhost:8888/?token=Example_Jupyter_Token_3cadb8b8b7005d9a46ca4d6675
[I 20:35:17.315 NotebookApp] Use Control-C to stop this server and shut down all kernels (twice to skip confirmation).
[W 20:35:17.315 NotebookApp] No web browser found: could not locate runnable browser.
[C 20:35:17.316 NotebookApp]
. . .
|
...
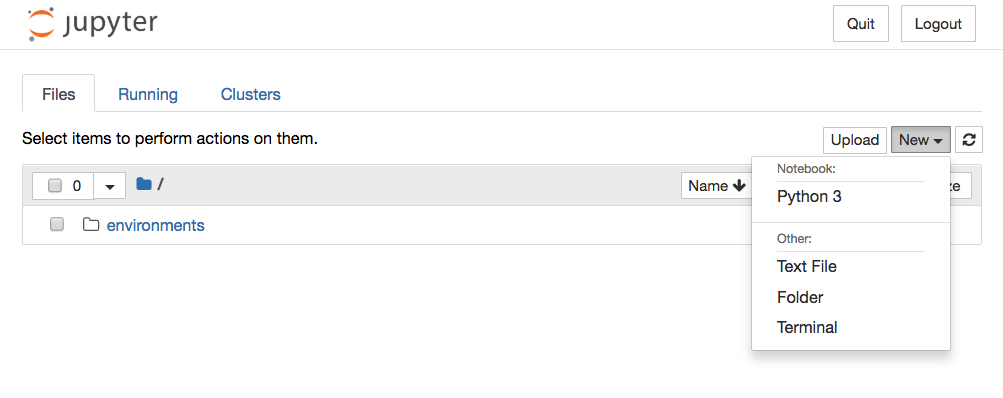
Create a new notebook file by clicking New then Python 3 at the top-right of the Notebook Dashboard:

Type in 3+3 in the input box and press Ctrl+Enter to see the output
 Image Added
Creating a directory to keep your Jupyter Notebook documents
Once you had installed Supervisor, you can proceed with creating a directory to keep your Jupyter Notebook documents. For example, you can run the following command to create the contents directory inside the ~/jupyter directory:
$ mkdir ~/jupyter/contents
|
Creating a shell script to run Jupyter Notebook within the virtual environment
Next, proceed to create a shell script to run Jupyter Notebook. In order to do so, run the following command to create a shell script at ~/jupyter/run-jupyter-notebook.sh:
$ vi ~/jupyter/run-jupyter-notebook.sh
|
When the editor loads, create the following content:
/homenvidia/jupyter/jupyter-env/bin/activate
jupyter notebook --ip 0.0.0.0 --port 9999 --no-browser
deactivate
|
After you had done so, press Esc followed by :wq to save the file. Once you had saved the file, make the file executable by running the following command:
$ chmod +x ~/jupyter/run-jupyter-notebook.sh
|
Running Jupyter Notebook as a server daemon
Each time the server is restarted, at this time, you will need to activate your virtual environment and start your Jupyter Notebook. In order to make Jupyter Notebook run whenever the server is restarted, Jupyter needs to run as a server daemon.
Creating the Supervisor configuration file to run Jupyter Notebook
In order to get Supervisor to run Jupyter Notebook, you will need to create a Supervisor configuration file. Run the following command to create a configuration file at /etc/supervisor/conf.d/jupyter-notebook.conf:
$ sudo vi /etc/supervisor/conf.d/jupyter-notebook.conf
|
Once the editor appears, create the following content:
[program:jupyter-notebook]
directory=/home
|
/nvidia/jupyter/contents
command=/bin/bash -E -c ../run-jupyter-notebook.sh
autostart=true
autorestart=true
stopsignal=INT
stopasgroup=true
killasgroup=true
user=
|
nvidiaAfter you had done so, press Esc followed by :wq to save the file.
Once you had saved /etc/supervisor/conf.d/jupyter-notebook.conf, run the following command to restart Supervisor:
$ sudo systemctl restart supervisor.service |
When Supervisor had restarted successfully, it will run your Jupyter Notebook for you.
...

